 Chuck Lorenz
On This Page
Until the Adapt authoring tool can accommodate the Language Picker, multilingual courses must be assembled within the Adapt framework. This article explains how to consolidate language-specific courses exported from the Adapt authoring tool into a single course and how to configure it to use the Language Picker.
Do you need to use the Language Picker?
If you are new to the question, think about it carefully. The Language Picker is a good solution when you cannot predict the language skills of a learner or when a learner needs the option of switching languages after beginning the course. It may be a good option, too, if you are tracking course completion of a single cohort that has multiple first-languages. But the Language Picker may not be necessary in situations where different language regions are responsible for delivering and tracking their own content. Having each region host single-language content may be as effective and more manageable. It's yours to decide, but don't assume the Language Picker is necessary whenever multiple language versions are involved.
No getting around the framework
The only way to avoid working in the Adapt framework is to host single-language courses as standalone courses. If you want to use the Language Picker, sooner or later you'll need to work with the directory structure of the framework, set a configuration value or two in JSON, and use the command line to generate the SCO or SCORM package.
There are many workflows that can be used to produce multilingual content. If translators are present in-house, duplicating a course and translating it directly in the authoring tool may be an efficient workflow. Seeing the text content in the context of a running course can improve the quality of translations and localizations. But this workflow produces independent courses. Obviously the text content is independent; but so too are all the assets (graphics, videos, audio), and the custom CSS you added, and the source code for each of the course's plugins. When a course is being translated while it's still in the AT, all this is at risk of being altered—OK, the source code less so. And maybe the risk is minimal; but accidents do happen.
Another workflow makes use of commands within the framework to facilitate the translation process. The base language course is created in the authoring tool. The complete source code is exported and then opened as a framework project. Using the command line, the text content is exported as a csv file. This file, which can be opened in any spreadsheet application, is delivered for translation. Upon return, the translated csv is imported to the framework using the command line, and the translated course is automatically assembled. This workflow does not require the translator to have access to the authoring tool. And since there is no access to the course, there is no risk of [inadvertent] changes to the course.
Since there is currently no way to engage the Language Picker without working in the framework, I am encouraging you to familiarize yourself with the framework's export/import process. It opens doors to a variety of translation workflows.
How the Language Picker works
Knowing a bit about how the Language Picker works helps to understand the process I outline below. In response to the learner's input, the Language Picker sets the course's active language. From this, the "lang" attribute is set in the html tag (e.g., <html lang="de">), and the course content is loaded from a directory with a name that matches the "lang" attribute. The language directories are located in the /course folder and can look something like this:
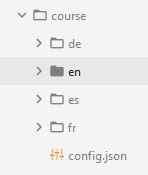
Your goal is to provide language-specific content in an appropriately labeled folder. You'll pluck these from courses exported from the authoring tool.
The Language Picker does nothing to ensure that the content aligns between different language versions of your course. It simply determines which folder will be used to present content data to the learner. You can choose to create language-specific courses whose content corresponds component-to-component. Or you can take an approach that addresses content without a one-to-one correspondence. For example, a course addressing workplace procedures might require certain issues to be addressed in one culture but not in another. These course versions may end up with differing block/component totals. If you choose to pursue the latter approach, be sure to consider the ramifications of a learner switching languages mid-course and its impact on completion in an LMS.
Create your courses in the authoring tool
The following procedures assume a workflow where language versions of a course are being built in the authoring tool. It also assumes that all the plugins used by the translated courses are being used by the base language course. (Of all the plugins and assets loaded in your AT, the only ones to be exported are those that are in use by the exported course.)
- Use the authoring tool to create a course in your base language. Finish the course. Completely.
- Duplicate the course. Change the name/label on the copy to indicate the target language. ("Title" found at )
- Verify/change the "Default Language" code in the copied course (found at ) to match the target language. Because this code will be used as the value of the "lang" attribute in the html tag, it is important to use a code that adheres to the HTML standard. This value will be used also to name the content folder during export.
- Translate the duplicated course.
Export the courses
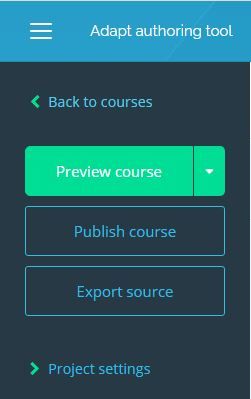
- Export the complete source of your base language course using the button labeled "Export source".
- Export the SCO of any translated/localized versions using the button labeled "Publish course". (You can work with the exported source of all courses, if you like. Here I recommend exporting the source from only the base language in order to minimize confusion and to avoid mistakes.)
Assemble the courses in the Adapt framework
Notes about the relationship of the AT to the FW and the SCO to the build folder
- The framework (FW) is the engine of the authoring tool (AT). The AT is basically a user-interface wrapped around the FW.
- The AT allows you to "export source" and to "Publish course".
- When you export the source code of a course, you are, in effect, exporting an instance of the framework that includes your course content.
- When you publish the course, you are exporting the SCO. This is only a portion of the source code. It is the portion that is appears in the framework as the
buildfolder.
- To create a SCO in the framework, run
grunt build. Then compress/zip the contents of the build folder (do not include the build folder itself). Rename the zip archive to identify its contents.
Finish installing the framework
- Extract the zipped export of your base language course. This should be the entire source code, not just a published SCO. We will use this to complete the installation of the framework. There are system requirements/prerequisites for the Adapt framework (reference the install instructions) but most systems meet these or we'll be addressing them in the steps below.
- Open your computer's command prompt or terminal.
- Navigate in the command prompt to the root folder of your extracted source code. (The "root" will be he folder that contains the src folder (among other files and folders.)
- Run the following commands:
npm install grunt-cli -g
npm install grunt
npm install
grunt build - Verify all is working by viewing the running course. Running the following command will open a browser and display the course.
grunt server - Once you have verified the course runs as expected, terminate the server. Make the command prompt the active window by clicking on it. Then press Ctrl+C.
Add additional language content
Repeat the following steps with each translated course.
- Unzip/extract the published course.
- Locate the named language folder inside
course(e.g., "de" found located atcourse/de) and copy it. - Go to the framework that contains your base language course and paste this language folder inside the "course" folder so that it sits alongside your base language folder.

Install and configure the Language Picker
- Download, extract, and install the Language Picker in the
src/extensionsfolder of the base course framework. Refer to instructions in the README if necessary. - Configure the Language Picker following the model in example.json and using the attribute descriptions in the README.
When configuring the Language Picker, include data for all languages present in the course folder. Delete data from the "_languages" array for which there is no corresponding course.
Build and test
- Return to the command prompt. The root folder should still be the current working directory. If not, navigate to the root.
- Run the command:
grunt build - To view the course, run:
grunt server - Once loaded, the course should begin with the Language Picker using the default language. Select a language to enter the course proper.
- Locate the internationalization icon in the navigation bar and select it. The Drawer should slide out allowing you to select a different language. Select each in turn to verify all are present and working.
- To stop the server, use the keyboard command Ctrl+C.
Create the SCO
- Run the following command before creating a SCO:
grunt build - After the command completes, zip/compress the contents of the build folder.
- Rename the zipped SCO to properly identify it. I highly recommend including date/time info in the name.
Some notes and options
- A multilingual course cannot be imported by the Adapt authoring tool.
- Using the Language Picker means all the course versions share the same code base for the Adapt core, theme, and all the plugins. For example, a customization to the theme will be manifested in each version of the course.
- By following the process described above, however, assets are not shared. Each language folder contains its own copy of every asset even if the same one is used by the base language and each of the different versions. This duplication does not affect the performance of the running course. But the SCO that is uploaded to an LMS will be larger than if the assets were shared. This is rarely an issue, but may be a concern if storage space on the LMS is limited.
- If you want to share the assets in a single base version, say from "course/en/assets", you must modify the assets' paths used in the JSON files of the various courses. Modify these so that they point to this new directory. "Find and Replace" is a quick way to make this kind of substitution. In this example using "en", an original path like this one
"src": "course/de/assets/2f99aba0a3b2a49027c25e6e25713a164dbbdd1d.jpg"
could end up looking like this:
"src": "course/en/assets/2f99aba0a3b2a49027c25e6e25713a164dbbdd1d.jpg"
Make these path modifications and test them before deleting the redundant asset folders and their contents. - Some assets may contain language-specific content. This commonly occurs in audio narration. It is likely to happen in images of charts and tables. Arguments can be made for retaining language-specific assets within the associated language course and for housing all assets, regardless of content, in a single location. Each approach comes with drawbacks. Your team will need to weigh the pros and cons.