 Chuck Lorenz
On This Page
You'll frequently hear that the Adapt framework provides more creative flexibility and quicker production turn-arounds than the Adapt authoring tool. After all, the framework is the engine of the authoring tool. The development of the user interface is in a perpetual race to catch up with the framework. So it can't be as effective as the framework. Is this true? "Yes" is the much too short answer—and not one we'll explore here. It's the frequent follow-up question that I want to address: "Should I try the framework? if even if I'm not a programmer?" Again, "Yes" is the much too short answer. I believe you should try it. How much you want to use it may depend on your skillsets, the learning curve, and your workflow. In this article I give you insights and exercises to help you determine if you want to work in the framework and what kinds of tasks you might choose to do.
Let's begin by thinking about the skillsets of a coder.
What's in a programmer?
Step away from the mystique for a moment. Forget that image of a coding wizard whose args = args.filter(v => v !== null) feel like runes pulled from a book of potions and whose "run it from git bash, not powershell" sounds as commanding as "Expecto patronum!" Every profession has tasks that can be taught to someone who is not a professional. You don't have to be a doctor to practice good nutrition. You don't have to be a contractor to tile a kitchen backsplash. The same holds true in this situation: you don't have to be a developer in order to ______. Just be careful how you fill in the blank. A home remodel can easily become a home "remuddle" when one doesn't respect limitations. It's your responsibility to recognize what you can and cannot do; and what you ought not to do, even if you are capable.
Let me start by identifying some attributes that your favorite developer was born with or practiced until they seemed innate. These are skills that you will need to accomplish any task in the framework.
Comfort with technology
Nearly everyone I can imagine reading this article meets this threshold. But if you are someone who gets flustered by searching through dropdown menus or who needs to know what every option does before choosing one, think twice. The framework is going to require you to use tools you haven't seen before. You don't have to understand how they work; you simply have to know how to use them for the task at hand.
Accuracy
This kind of accuracy is not about being "right;" it's about being "true." Can you use your keyboard or mouse to duplicate a sentence perfectly? Can you duplicate it perfectly even when it's in Arabic? No, I'm not asking you how good you are with languages. The question is about computer skills—and about what your brain tends to overlook. Turn back now if your work emails look like txts your thumbs smashed out between pints. A degree of sloppiness can be charming between friends, but it has no place at work or in coding.
Pattern recognition
Next to a good memory, the ability to recognize patterns is one of the most important attributes of a coder. It is a luxury in life to have enough time to fully learn a programming language. So how does one fill in knowledge gaps? Well, besides googling, developers look for patterns in established code and apply them to the task at hand. Are you willing to look through code that you don't fully understand to find something similar that can serve as your model?
I think these three—comfort with technology, accuracy, pattern recognition—are fundamental to success with the framework. If they are not attributes you associate with yourself, you may experience a steeper learning curve.
Still with me? Good! I wouldn't turn anyone away who is willing to give it a try. Let's talk a little about why you want to try the framework, about what you are hoping to achieve in the framework.
Can you do it all?
Hmm, "can you" and "should you."
When I look at jobs posted in the U.S., it is quite clear (and a bit worrisome to me) that learning designers are expected to do it all: assess the need, design the solution, storyboard the learning, write the learning, design the graphic presentation, create the graphics, build the course, and create a lovely spot for it on the LMS. I'm sure some of these job posts are intentionally shooting for the moon, but unfortunately it builds an industry-wide expectation. So, is it reasonable to expect that one person who is not an experienced developer can "do it all" in the framework? Can someone who is not trained in HTML, CSS, JavaScript, and JSON build an e-learning module in the framework from start to finish? The objective answer is "yes." But my response requires some qualification.
If you are a department of one, with no web programming experience, I think you can expect to build a simple course in the framework. ("Simple" is not a negative judgment of the quality of learning or an indication of its length.) Keep your vision in check. Use only bundled and well-tested plugins. Do not try to customize anything other than theme styles such as colors, fonts, margins, and padding. It goes without saying that there'll be a learning curve. It will take you longer to build a course in the framework than if you were using the authoring tool—at least to begin with. If you do not have a rushed deadline or if your long-term goal is proficiency in the framework, have at it! But my response to "should you build in the framework" ends up on the low end of the range slider.
If you are one of these lone wolves—and without training in web technologies—please assess your motivation for exploring the framework. I think you'll be more effective overall by improving skills, such as CSS/Less and graphics manipulation, that you can employ when using the authoring tool. If you're daunted by the prospect of installing the authoring tool, consider a hosted solution. A free trial is typical.
If you are part of an e-learning team, you don't have to do it alone, do you? Maybe "doing it all" in this context means "assembling it all" and ensuring it works. You'll concentrate on climbing that learning curve while others produce texts and assets. If you are already using the authoring tool, you're at an advantage because you'll make all sorts of connections with the code and properties that you'll see in the framework. Understanding how the framework works opens the door to efficient processes. It's a great way to understand how to make best use of the team's talents. It doesn't have to be either "all in the framework" or "all in the authoring tool." If your motivation to learn the framework falls into categories like workflow efficiency, task-role alignment, and cross-training, then I'm 100% behind you. My range slider has moved up to the high end. (But that's also because I don't think you'll actually end up doing it all. 😉)
Incremental learning
If you're going to learn to use the Adapt framework, I recommend that you work your way through the following exercises. These exercises cover the most common tasks encountered while building a course in the framework. Do each one separately. Because you are not trained in web technologies, it is likely that you'll have to figure out some things on your own. By combining or skipping exercises, you're increasing the risk of overwhelming yourself.
"Install the framework" and "Install an IDE" are not really about using the framework per se. But they are steps that have to be done. I believe you can do these alone, but don't end your framework exploration if you decide to turn to someone for help with these two.
Install the framework
You do not install the framework by downloading a file and then double-clicking it. You'll need to work a bit with the command line. While any console terminal should work, there have been times when Windows' Command Prompt has failed me. When I repeated the same command using Git Bash, it succeeded. If you accept defaults while installing Git, you'll end up installing Git Bash (a good thing). You can review these instructions to see how Git Bash is integrated with the Git install process.
A brief version of framework install instructions is found in the source code repository. A longer version with more technical explanations is found in the framework wiki. If the instructions have you choose between installing manually and installing by using the Adapt CLI, I recommend that you use the Adapt CLI (e.g., adapt create course).
Install an IDE
An IDE will help you make sense of the code, improve your accuracy, and recognize patterns. Most any IDE will do, but it has to handle web technologies like JavaScript, HTML, CSS, and JSON. I recommend you install Visual Studio Code. It has a good reputation and is free. I use it in the following exercises. Install these VSCode extensions right away (h/t Oliver Foster):
- ESLint (Dirk Baeumer)
- Handlebars (Andre Junges)
- Indent 4-to-2 (Compulim)
- Prettify JSON (Mohsen Azimi)
Use Grunt
As you saw in the install instructions, you need to use Grunt commands for a few tasks. Grunt is a scripted task runner. Running a single command executes a sequence of tasks. (Read "Using Grunt in the framework" if you want to learn more.) For example, in the following exercises we'll make changes in the src folder, and our Grunt commands will copy them into the build folder.
You will frequently use grunt dev, grunt server, and ctrl+c. Less frequently you'll use grunt build —save that one as part of building a SCO.
- Open the root of your framework installation in your IDE. Typically the root will be the folder whose name matches what you entered with
adapt create course ____. - Open a Terminal at the bottom of your IDE. Type
grunt devfollowed by the Enter key. When the console messages display a timestamp followed by "- Waiting...", proceed to step 3. - Open a second Terminal window or tab, and type
grunt serverfollowed by the Enter key. If successful, the console messages will direct you to https://localhost:9001. Or it may open a browser window to that same URL. - Explore your running course.
- Return to the Terminal that started the server and open the browser window. While that Terminal is active and focused, press the following key combination: CTRL+c
That will terminate theserverprocess. - Use the technique from step 5 to terminate the
devprocess.
Note: server and dev operate independently of each other. server will continue to present files from the build even if dev has been terminated. dev will continue to watch for files changes even if server has been killed. No harm can be done by the order in which these are started and stopped.
Change some text content
In Adapt, text content is represented in JSON. It is human-readable. You will make the vast majority of your content changes by modifying text in JSON files.
JSON consists of key and value pairs. Here's some models for you:
- text looks like this:
"key": "value" - numbers looks like this:
"key": n - true/false looks like this:
"key": true
Look for patterns in these models. Notice that values for numbers and true/false (boolean values) are not surrounded by quotes.
Two other fundamental points:
- Key/value pairs are separated by a comma.
- Key/value pairs can be grouped by curly braces or square brackets. They are not interchangeable. If you accidentally delete one, look for and match its widow.
In framework version 5 and earlier, you'll find the JSON files for the course in this folder: "[adapt_framework]/src/course/en".
("en" stands for "English." This may be different if you are working with other languages.)
- Use what you learned from the previous section to start
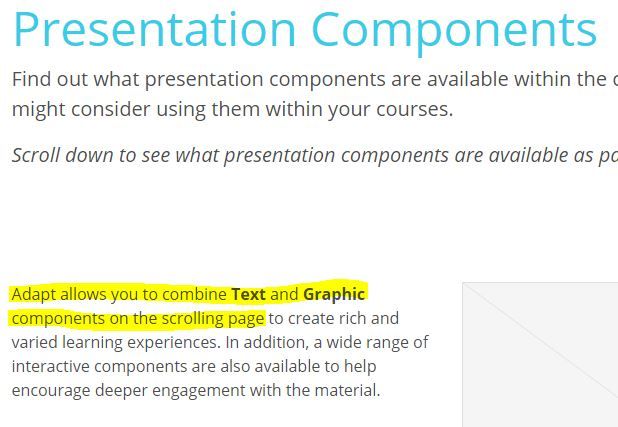
devandserver. Leave these processes running as you work through the following exercises. Terminate them with CTRL+c when you are finished for the day. - Switch to the browser window displaying the course. Open the menu item "Presentation Components." Locate the phrase "Adapt allows you to combine text and graphic components on the scrolling page".
- Switch back to your IDE and open the "components.json" file. It can be found the "en" folder that houses the course's JSON files.
- In "components.json", locate the phrase "Adapt allows you to combine text and graphic components on the scrolling page". Be sure to explore your IDE's "Find" (typically CTRL+F) function.
- Locate the same phrase, this time using a different technique. In your IDE's project explorer, right click on the "src" folder to the display the context menu. Most IDEs will have an option similar to "Find in Folder" or "Find in files". Select it and practice using it. Adopt it as your primary method for locating text to edit; it's that useful.
- Change "Adapt allows you to combine text and graphic components on the scrolling page" to "Adapt uses JSON and CSS".
- With "components.json" active and in focus, save the change with CTRL+s.
- Go to the browser that is displaying your course and refresh (F5) the page entitled "Presentation Components." Ensure that your recent edit is being displayed.
Reviewing Edits
When using a standard installation of the Adapt framework with grunt dev, the sequence is the same:
1. Complete the edit.
2. Save your work.
3. Refresh the browser.
This applies to changes made to JSON files (*.json), CSS/Less files (*.less), Handlebars files (*.hbs), and JavaScript files (*.js).
Change an image
Images can be embedded in the course, or they can be stored on a different server and referenced within the course using a URL. We'll look only at the first technique.
There are two main steps to this task: 1) add a new image to the course, and 2) reference the image in JSON.
- Use what you learned from the earlier section to ensure that both
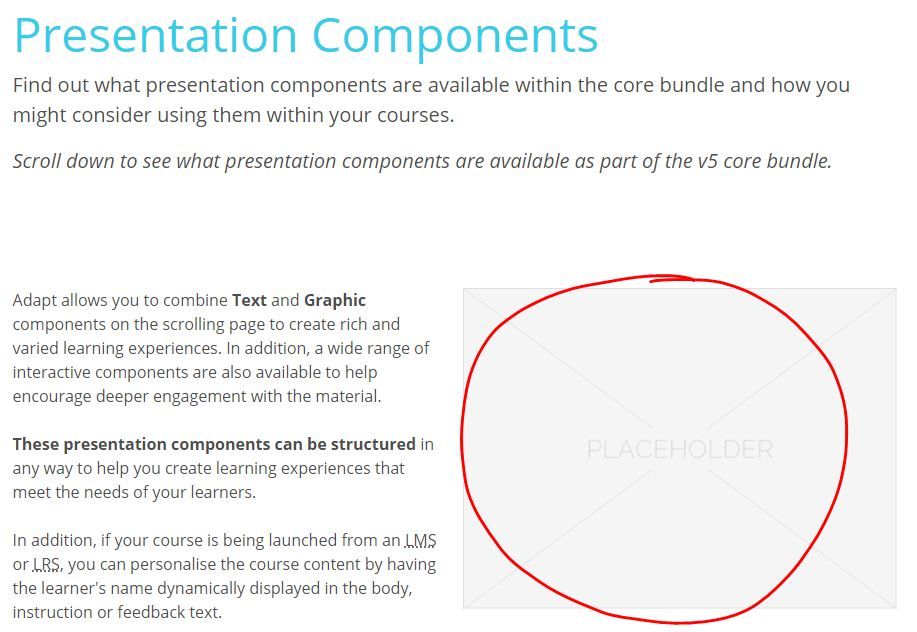
devandserverare running. Leave these processes running as you work through the following exercises. Terminate them with CTRL+c when you are finished for the day. - Switch to the browser window displaying the course. Open the menu item "Presentation Components." Locate the first image on the page, alongside the text you last edited. You'll replace this placeholder image.
- Switch back to your IDE and open "components.json" once again.
- In "components.json" locate the first graphic component. Try searching for
"_component": "graphic".
- Look at the section of JSON labeled
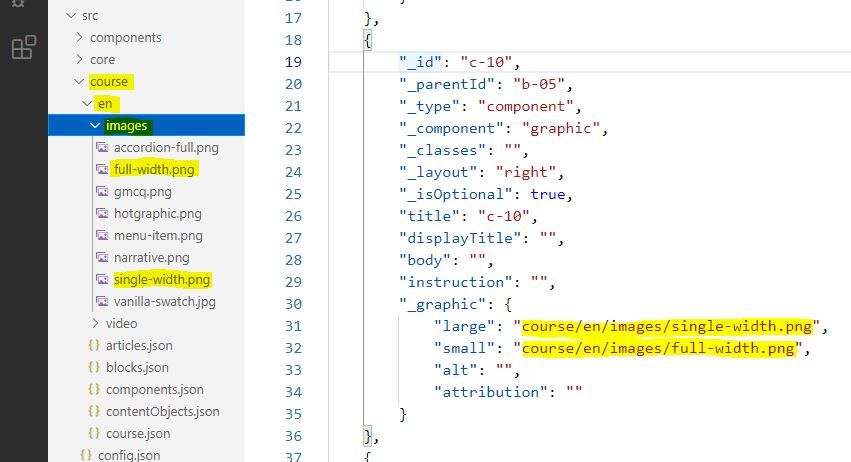
"_graphic": {. Notice that the path to the image files reflects the folder structure of the project folders. Following this path, you can locate the "single-width.png" image being used as a placeholder. Adapt stores image files in a folder called "images." To display a new image, the current images does not need to be deleted. You only have to change the JSON to reference your preferred image. - On your computer, identify a replacement image. Add the image to "images" folder at "[adapt_framework]/src/course/en/images". There's no special technique for this—copy-and-paste, drag-and-drop—whatever you prefer. And you can do this directly in your Files Explorer or Finder window. No need to find a way to do it from within the IDE. If the contents of IDE does not reflect the new addition, refresh the "images" folder by collapsing then expanding it once again.
- Because your additional image is in the same location as the original placeholder image, you only need to change the file name in the JSON. Modify these two key/value pairs by replacing the current image names with the name of your image:
"large": "course/en/images/single-width.png",

"small": "course/en/images/full-width.png", - Save your work, and refresh the browser page to see your new image in place.
Change a color
We'll step away from JSON for this exercise. The way Adapt courses are presented in a web browser is the same as any website: it is controlled by CSS—cascading stylesheets. While the browser consumes actual CSS, Adapt utilizes a CSS preprocessor called Less. Less makes writing a lot of CSS easy by introducing some features such as the use of variables. In the end, through the use of commands like grunt dev and grunt build, Adapt produces unadulterated CSS for web browsers.
In this exercise, you'll change the color of the component titles. by altering the value of a Less variable.
- Use what you learned from the earlier section to ensure that both
devandserverare running. Leave these processes running as you work through the following exercises. Terminate them with CTRL+c when you are finished for the day. - Switch to the browser window displaying the course. Open the menu item "Presentation Components." Note the color of titles such as "Text", "Graphic," and "Narrative." You'll be changing this to purple.
- Switch back to your IDE. Instead of working in subfolders of the "course" folder, we'll work in subfolders of "theme\adapt-contrib-vanilla". We'll begin by establishing a new variable for the purple color.
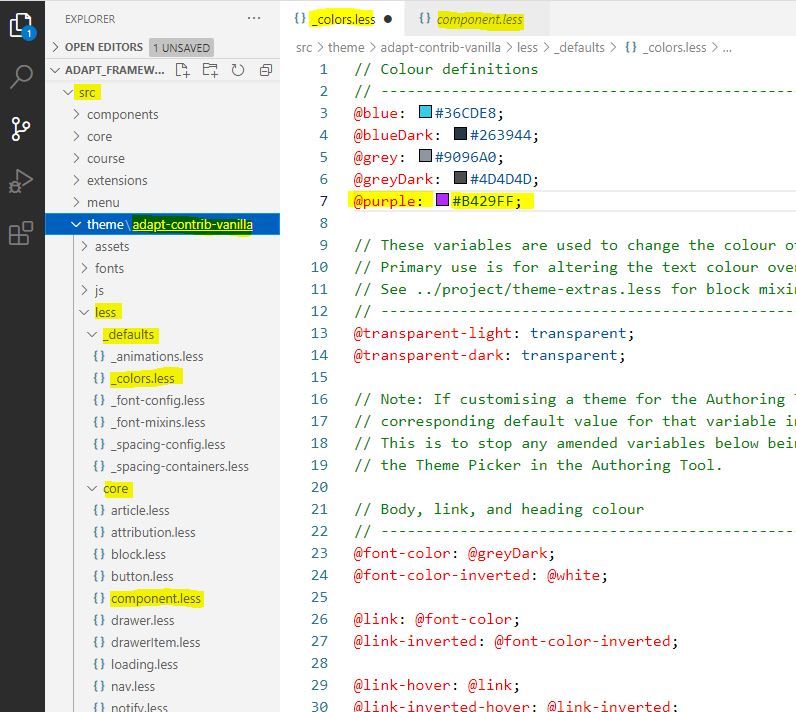
- In the project structure, locate and open the following file:
"[adapt_framework]/src/theme/adapt-contrib-vanilla/less/_defaults/_colors.less"
This file contains many variables related to colors. All variables begin with the @ symbol, for example, @blue. - Locate the "Colour definitions" at the top of the file. Add the following to the bottom of the list of colors:
@purple: #B429FF;
By doing so, you create a new variable@purpleand assign it a digital color represented by#B429FF.
- Save your work (CTRL+s).
- In the project structure, locate and open the following file:
"[adapt_framework]/src/theme/adapt-contrib-vanilla/less/core/component.less"
This file contains many of the basic styles used in components. - At the top of the file you'll find several style rules assigned to the component title. Notice the color of the title text is assigned the value of the @heading-color variable.
- Locate the @heading-color variable in the project files. I recommend using "Find in Folder." (Ultimately, you'll find it again in the "_colors.less" file.)
- Change
@heading-color: @blue;
to@heading-color: @purple; - Save your work, and refresh the browser page to see the new color of the headers.
Add a resource
(We're headed back to JSON files!)
There are a number of JSON files that represent the course's content and configuration properties. They are stored in the logically-named folder course. Until you learn what is stored in each file, locate what you need through "Find in Folder." For example, in this exercise you'll add a video to the Resources found in the slide-out Drawer. Start by searching for "resources".
- Use what you learned from the earlier section to ensure that both
devandserverare running. Leave these processes running as you work through the following exercises. Terminate them with CTRL+c when you are finished for the day. - In your IDE, right-click on the "src/course" folder and select the "Find in Folder" option.
- Search for "resources".
- The results that are returned may be confusing at the start. In a short time, you'll recognize patterns that will help you sort through such results. Notice that they are grouped by the page on which they are found: "course.json". A single page was returned this time because we narrowed the search to the "course" folder. If you are uncertain which is the result you seek, simply open them in turn. For this exercise, select the result that begins with the underscore:
"_resources": {. "_resources"represents the entire configuration data for the adapt-contrib-resources plugin. Review its use of curly braces, square brackets, and commas. While it is not necessary now to understand what they represent, it is very necessary not to violate the patterns in which they are employed.
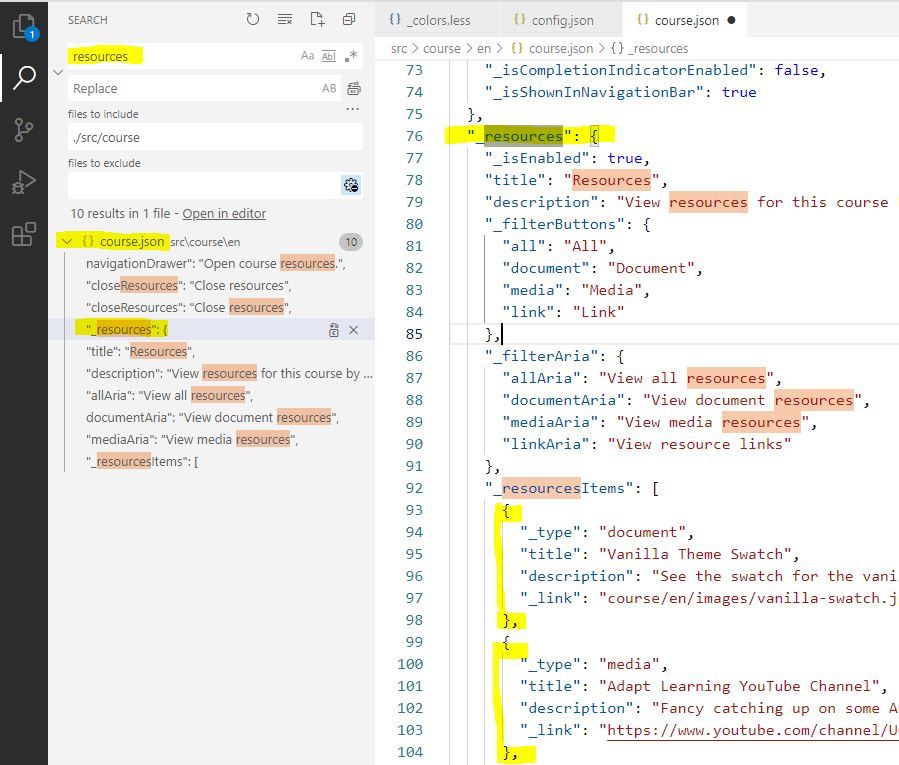
- Add the following JSON after the last item in the section that begins
"_resourceItems":
,
{
  "_type": "media",
  "title": "Responsive Design Demo",
  "description": "Introduce yourself to responsive design by clicking here.",
  "_link": "/course/en/video/c-40.mp4"
}
Do not overlook JSON patterns: the code begins with a comma to separate it from the item that precedes it, and it must be followed by the existing square bracket.
7. Save your work, and return to the course running in the browser.
8. Explore your new addition by clicking on the list icon in the upper right corner.
Add a component
In this final exercise, you'll add a Text component (adapt-contrib-text) to the Presentation Components page.
The exercise is a little longer than the others because you'll need to add a block in addition to the component. And I'll feel compelled to point out more patterns along the way! Like these:
- Adapt modules typically employ a hierarchy of containers: "course" contains "page"; "page" contains "article"; "article" contains "block"; and "block" contains "component". Due to the sequence "article > block > component", this structure is often referred to as "ABC."
- To establish this relationship, each element carries its own ID and the ID of its parent. You'll see this pair in the course JSON files.
"_id": "c-10",

"_parentId": "b-05", - It's common for Adapt developers to increment the IDs by intervals of 5. You'll often see sequences like "c-100", "c-105", "c-110", "c-115". This is a strategy—not a coding requirement—that allows new elements to be inserted without causing a complete renumbering of IDs. If needed, you can add a new component with an ID of "c-107" between components "c-105" and "c-110". We'll do that below.
- Use what you learned from the earlier section to ensure that both
devandserverare running. Leave these processes running as you work through the following exercises. Terminate them with CTRL+c when you are finished for the day. - In your IDE, locate the "components.json" file in the "src/course/en" folder and open it. Review the patterns of repeating data. Components are grouped by curly braces and are identified as such by the key/value pair of
"_type": "component". Knowing that blocks are containers for components, examine how the position of components is determined by thelayoutproperty:"_layout": "right","_layout": "left", and"_layout": "full". Blocks indicated by the_parentIdof "b-05" and "b-10" are both filled by two components: one with"_layout": "left"and the other with"_layout": "right". You'll create a new block with"_id": "b-07"to fit between "b-05" and "b-10". ("b-07" is arbitrary but makes sense from the perspective of human readability and organization. Adapt simply requires that the ID be unique.) It will contain our new full-width Text component. - Locate the "blocks.json" file in the "src/course/en" folder and open it. We need to create a new block, so you'll copy an existing block and paste it between "b-05" and "b-10".
- Copy the block with
"_id": "b-05". In the demo course for framework version it looks like this:
{

"_id": "b-05",

"_parentId": "a-05",

"_type": "block",

"_classes": "",

"title": "b-05",

"displayTitle": "",

"body": "",

"instruction": "",

"_trackingId": 0,

"_onScreen": {

"_isEnabled": true,

"_classes": "fade-in-bottom",

"_percentInviewVertical": 50

}

},
And paste it directly after itself. You should end up with a block with"_id": "b-05"followed by another block with"_id": "b-05"followed by a block with"_id": "b-10". Like components, blocks are delineated by curly braces and multiple blocks must be separated by a comma. Edit these braces and commas if necessary. - In the second/duplicated "b-05" block, change the value of
"_id"and"title"from "b-05" to "b-07". - Save your work. If the terminal in your IDE reports an error about an orphaned ID, ignore it. It's correct, of course. The "b-07" block is empty and unused as it stands. But we're about to give it a child component, and that will resolve the error.
- Return to the "components.json" file. Copy any component with
"_component": "text". I'd recommend copying"_id": "c-15"since it is the closest. - Paste the Text component directly before the component with
"_id": "c-15". You should end up with a component with"_id": "c-10"followed by a component with"_id": "c-15"followed by another component with"_id": "c-15". Remember to inspect braces and commas and to adjust as necessary. - In the duplicated component,
(a) change the value of"_id"to"c-12";
(b) change the value of"_parentId"to"b-07"in order to establish a relationship with the block you recently created;
(c) change the value of"_layout"to"full";
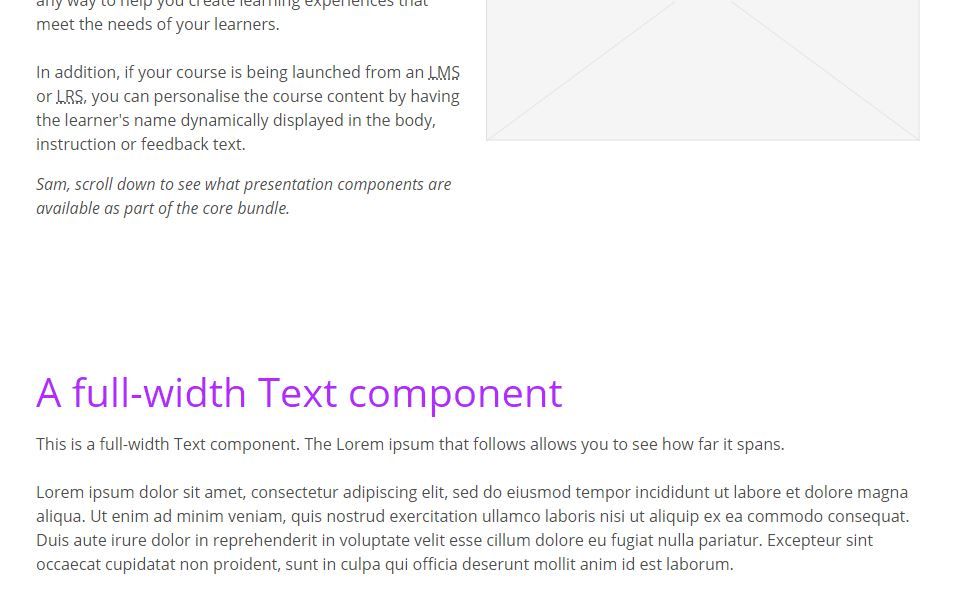
(d) change the values of"title","displayTitle", and"body"to anything that suits you. My version looks like this:
{
    "_id": "c-12",
    "_parentId": "b-07",
    "_type": "component",
    "_component": "text",
    "_classes": "",
    "_layout": "full",
    "title": "A full-width Text component",
    "displayTitle": "A full-width Text component",
    "body": "This is a full-width Text component. The Lorem ipsum that follows allows you to see how far it spans.<br><br>Lorem ipsum dolor sit amet, consectetur adipiscing elit, sed do eiusmod tempor incididunt ut labore et dolore magna aliqua. Ut enim ad minim veniam, quis nostrud exercitation ullamco laboris nisi ut aliquip ex ea commodo consequat. Duis aute irure dolor in reprehenderit in voluptate velit esse cillum dolore eu fugiat nulla pariatur. Excepteur sint occaecat cupidatat non proident, sunt in culpa qui officia deserunt mollit anim id est laborum.",
    "instruction": "",
    "_pageLevelProgress": {
        "_isEnabled": true,
        "_isCompletionIndicatorEnabled": false
    }
},
- Save your work, and return to the course running in the browser in order to review your addition.
Conclusion
With these exercises, you have hit the the major work course authors do in the framework:
You've edited text, swapped out an image, changed some CSS, added a resource and a component.
My intent wasn't to teach you everything you need to work successfully in the framework. My intent was to provide adequate instructions for you to perform some common tasks. Hopefully you were able to accomplish some, if not all, of them. By doing these exercises you can better judge for yourself how effectively you can work in the framework and what kinds of tasks are appropriate for you.