 Chuck Lorenz
On This Page
When working in the Adapt authoring tool (AT), all your assets—images, PDFs, videos—get uploaded to one place: Asset Management. There they remain available to all your active courses and sit ready to be deployed in something new. They also sit there long after a course has been exported and even after a course has been archived or deleted. And they sit alongside iterations of images that were uploaded while you were correcting brand colors or making alterations for the client—all those images that have no destiny, no use. Let's delete them! Hmm, if it were only that simple.
Watch on YouTube
Watch the video at the end of this article or jump to YouTube now!
The authoring tool does not delete assets
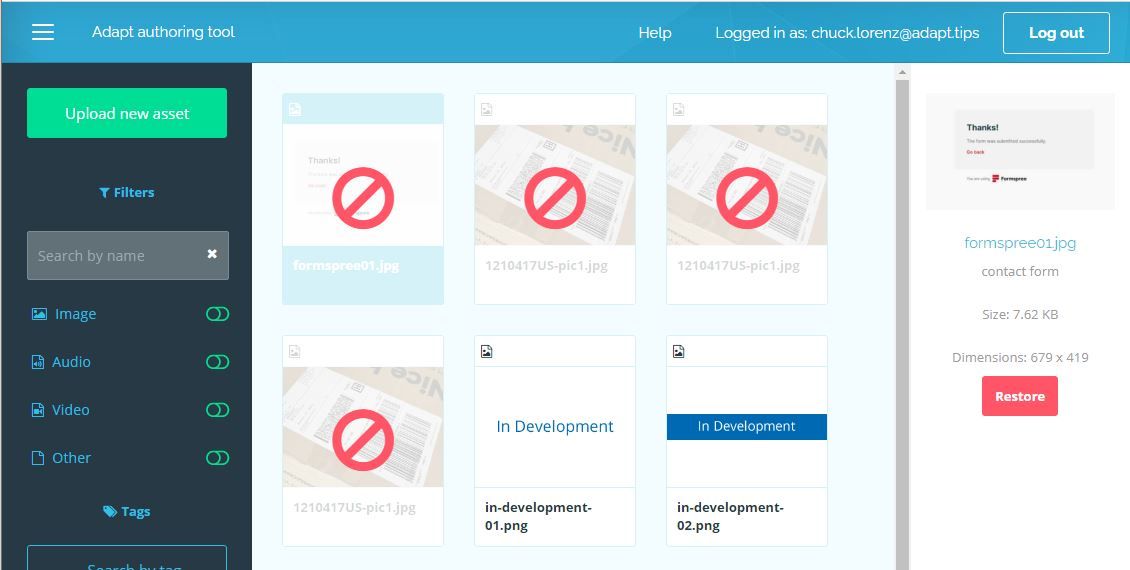
The authoring tool does not delete assets. The AT makes you believe you can delete them, I know. As a user, you are assigned one of three roles: "authenticated user," "course creator," or "super admin." As expected, permissions vary for each role. "Authenticated user" and "course creator" can click a Delete button that makes an asset disappear. But those deleted assets are still hanging around for the "super admin." Sure, their appearance has changed in Asset Management: they've all been decorated with the universal no symbol.
"Deleted" assets can be restored
The good news is that "deleted" assets are retained, so that "super admins" can restore them if required. A nice safety net!
The less-than-good news is that they remain to clutter up Asset Management--and the AT provides no way for "super admins" to permanently delete them. At least not as of version 0.10.5. Why not? Best I can tell is that it is the result of complex use-case scenarios and higher project priorities. I'm keeping my fingers crossed that it will be better addressed in a future version.
You can manually delete assets
Let's get real. "You" is a subset of the people reading this article. You can manually delete assets, but you need access to:
- the AT's MongoDB database, and
- the installation files on the AT server.
And I find it helps to be a "super admin" because the thumbnails in Asset Management can give you confidence as you proceed. The numbered instructions that follow presume that you fall into this privileged (or burdened!) subset of persons.
If you proceed, you are taking responsiblity for decisions that Adapt's core developers (and I) won't make for you. You'll want to address concerns of your team and systems that I can't know exist. But if you act prudently, you'll be OK.
Step 1: Ensure the asset is not in use
It's up to you to figure out how to do this. If you don't do it, you won't break the AT; but you may damage courses that are using the asset. And you may damage team relationships.
You do not need to be concerned about courses that have already been exported. There are no links between exported courses and the assets in stored in the AT.
Step 2: Mark the asset for deletion
In the AT go to Asset Management. Find the asset you want to delete and select it. While it is selected, click the Delete button.
Clicking the Delete button triggers a change in MongoDB—the document-oriented NoSQL database used by the authoring tool. The asset property "_isDeleted" is changed to "true". As mentioned previously, the asset doesn't disappear from Asset Management; only the thumbnail changes. It serves as a warning and reminder: "do not use me!". The asset's actual digital file (e.g., png, jpg, pdf, mp3, mp4, etc) remains on the server untouched.
In order to permanently eliminate assets that have been marked for deletion, you have to remove asset's record from the MongoDB. (Technically, it is a document and not a record in the traditional sense. But I'm going to continue to use "record" here for ease of reading.) Once that's done, the authoring tool's interface no longer knows about the asset, and it won't appear in Asset Management. But the digital files will still remain on the server. ("Files" is plural because there is the actual file and an associated thumbnail.) Mostly likely you'll want to delete them, too.
Next steps: get the location of the digital files from MongoDB; delete the asset record; delete the digital files from the server.
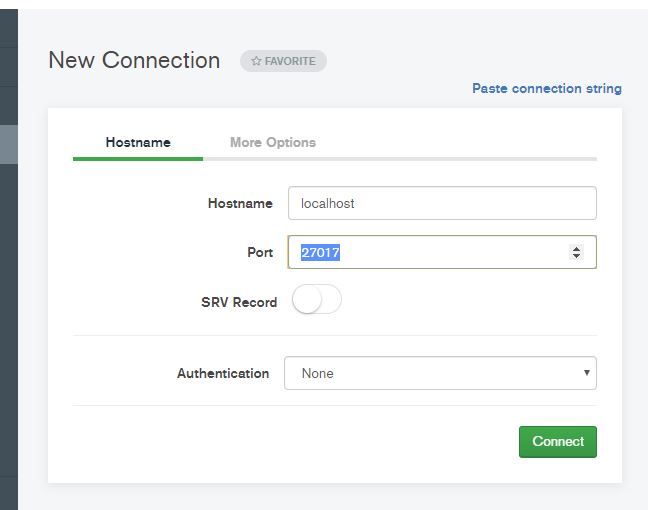
Step 3: Connect to MongoDB
Two easily accessible tools are commonly used to access MongoDB: Robo 3T and Compass. If you managed the installation of your authoring tool, you may have downloaded Compass when you downloaded MongoDB. Consequently, I'm going to reference Compass for this remainder of this article.
If you're reading this article for instruction, chances are really good that you are one of these two persons: (a) someone who successfully installed the AT on a computer/server, or (b) someone who has access to the IT dept that installed your AT. So I'm going to brush over the connection settings that are required. If you are person A, you have the ability to read Compass' instructions and to experiment until you get it right. If you are person B, chances are really good that you will be unsuccessful until you confer with someone from the IT dept—so go get your connection string.
Compass toggles between two ways to build a connection to MongoDB: "Paste connection string" or "Fill in connection fields individually." If your work does not regularly involve databases, I recommend that you use "Fill in connection fields individually." And if you installed the AT locally on your personal computer, chances are good that you installed MongoDB on the default port (27017) and without authentication.
Step 4: Query for "_isDeleted" assets
Once you connect to MongoDB, open adapt-tenant-master (or the name of your Adapt collection), then open assets. Your current goal is to locate the record of the asset you want to delete. Start by filtering assets. You're less likely to make a mistake if you're viewing only assets that have been marked for deletion.
Place this code in the query bar and click the green Find button:
{ "_isDeleted": true }
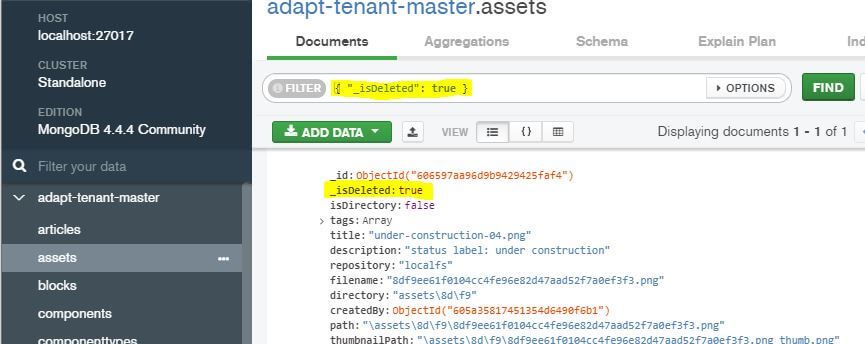
From the filtered results, identify the asset you want to delete. "title" and "description" are likely to help you the most.
Step 5: Capture the path to the digital files
Before deleting this record/document from MongoDB, you'll want to capture some data. Recall that the AT renames assets as they are uploaded. It also stores the digital files in a folder of its choosing. These digital files are not stored in MongoDB, but Mongo keeps track of the path to the files. Look at the data in "filename", "directory", "path", and "thumbnailPath".
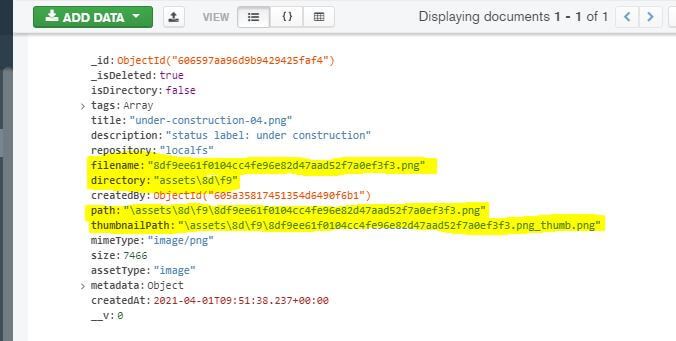
Some of this data is redundant for your purpose, but it's beneficial to see. This one asset consists of two files: the main image asset and a thumbnail of it. Both are stored in the same folder: "\assets\8d\f9" in our example. As long as you verify that no other assets are stored in these folders, you can simply delete the "8d" folder. Because the files are not within MongoDB, it really doesn't matter when you delete the digital files from the server. You can delete the folder and asset files while you have MongoDB open in front of you, or you can write down the path and file names and delete them later. In this example, we'll delete them later.
NOTE:
The root of "assets" is typically found at "adapt_authoring\data\master\".
Step 6: Delete the asset record
Once you have noted the asset path and filenames, you can delete the MongoDB document record for the asset. Hover over the asset record and a trash bin icon will appear in the upper right corner. Click on the trash bin. Then click the Delete button in the lower right corner.
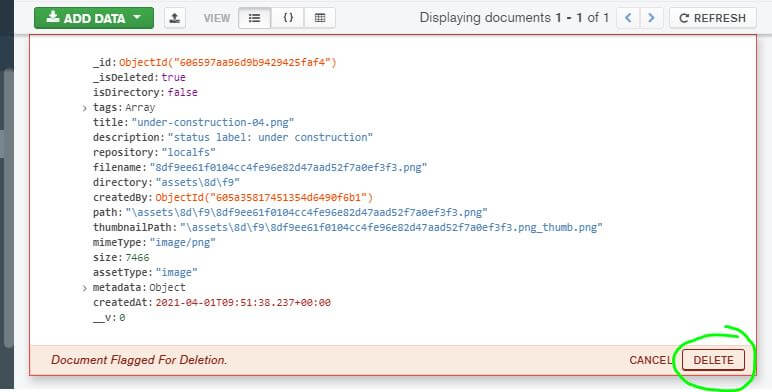
You can verify the asset is no longer tracked by MongoDB by clicking the Refresh button. Likewise, you can reload Asset Management in the AT and confirm that the asset no longer appears.
Step 7: Delete the asset digital files
Once there is no record of the asset in MongoDB, the authoring tool does not know it exists. But the files are still in among active assets in the AT installation. I recommend that you delete them from the server. Reduce clutter and file size, and avoid any chance of odd conflicts—that kind of thing.
Access the authoring tool installation on your server. Assets are typically stored along this path:
"adapt_authoring\data\master"
From there, use the path data that you captured from MongoDB. The path from our example was: "\assets\8d\f9". So you'd combine the two pieces to navigate to the asset files:
"adapt_authoring\data\master\assets\8d\f9"
Verify that the file names inside the terminal directory match the names you saw in MongoDB; and, if so, delete them. If the folders are now empty, delete them, too.
Conclusion
Working effectively means staying organized. Add tags and descriptions when uploading assets. Encourage your team to devise models for good tags. Create policies and schedules for archiving published courses. And consider including asset deletion in those schedules.